Algorithmic Trading on Hyperliquid DEX with Python and CCXT
Learn how to connect Python to Hyperliquid DEX using CCXT and place market, limit, stop loss, and take profit orders while keeping full custody of your funds.
Most decentralized exchanges force a choice: keep custody of your funds, or get the API tools that algorithmic trading requires. Hyperliquid eliminates that trade-off. Built on a fully on-chain order book with sub-second execution, it supports the full range of order types you'd expect from a top-tier centralized exchange: limit, market, stop loss, take profit, TWAP, and scale orders, with up to 50x leverage on futures.
The practical advantage for algo traders is significant. You write the same Python code you would for Binance or Bitget, but your funds never leave your wallet. No intermediary holds your capital, withdrawals stay under your control, and trading fees remain competitive. The API is natively supported by ccxt, the most widely used crypto exchange library, which means migrating an existing bot requires minimal code changes.
This guide covers the complete workflow: creating an account, generating API keys, authenticating with Python, and placing every type of order programmatically.
All resources for this guide:
- Hyperliquid — Sign up with fee discount
- Open-source code — Jupyter Notebook on GitHub
Setting Up Your Hyperliquid DEX Account
Connecting via Wallet or Email
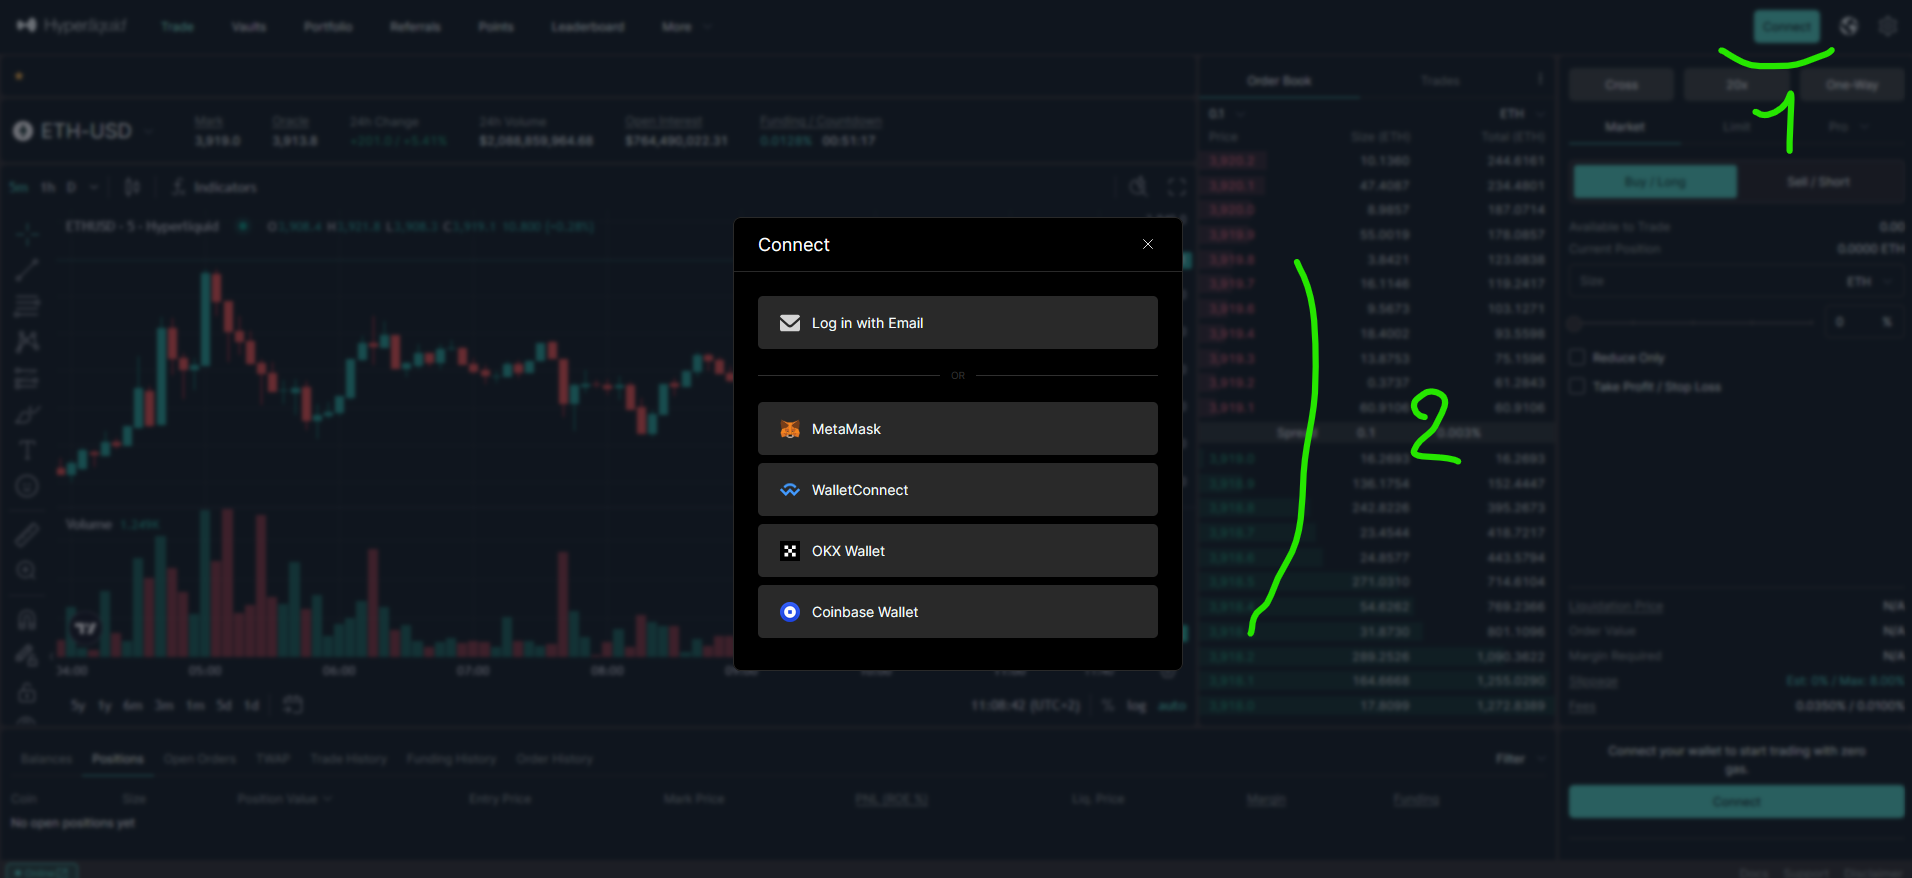
To start trading on Hyperliquid, click "Connect" in the top-right corner of the interface to open the connection panel. Two paths are available:
- Browser wallet (MetaMask, WalletConnect, OKX, Coinbase) — if you have a wallet extension installed, it appears automatically in the panel. Click it, approve the connection in your extension, and follow the confirmation steps.
- Email — enter your email address, verify with the code sent to your inbox, and your account is ready.
Depositing Funds
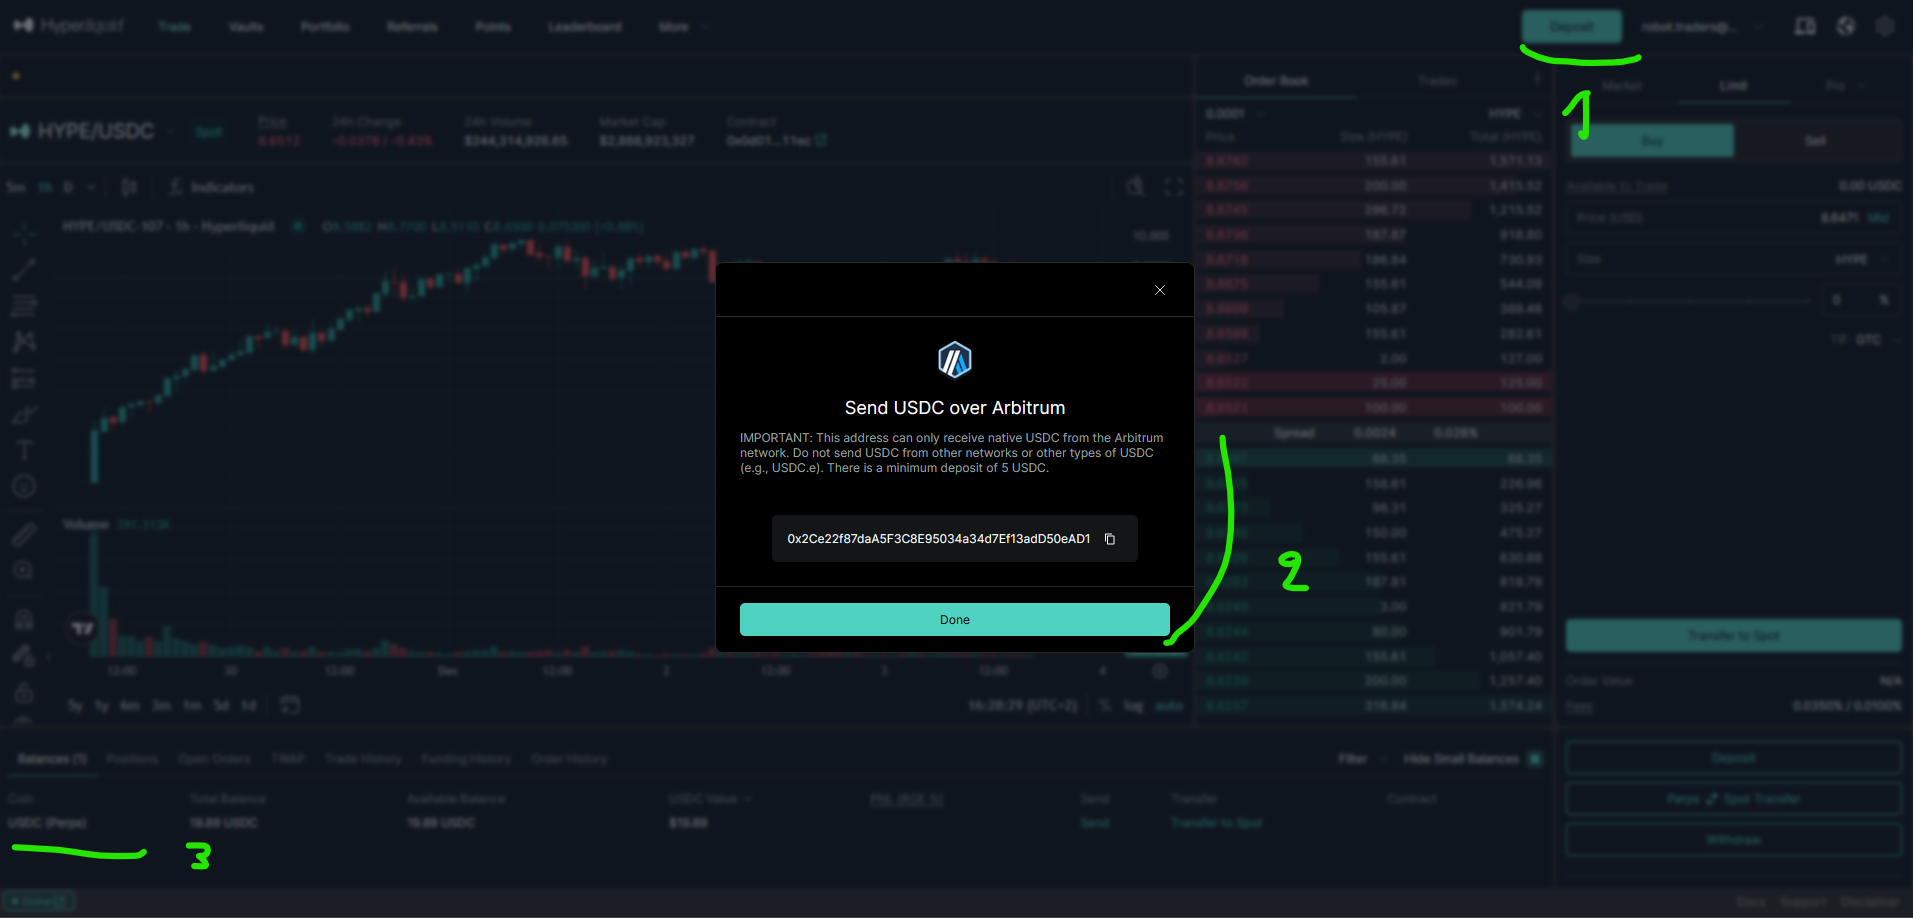
With your account connected, click the "Deposit" button in the top-right corner (1). Hyperliquid currently accepts USDC on Arbitrum One only (an Ethereum Layer 2 network designed for fast, low-cost transactions). The deposit address appears in the dialog (2). Double-check the network before transferring; sending tokens on a different chain means losing them permanently. Once the deposit completes, your balance appears at the bottom of the page (3).
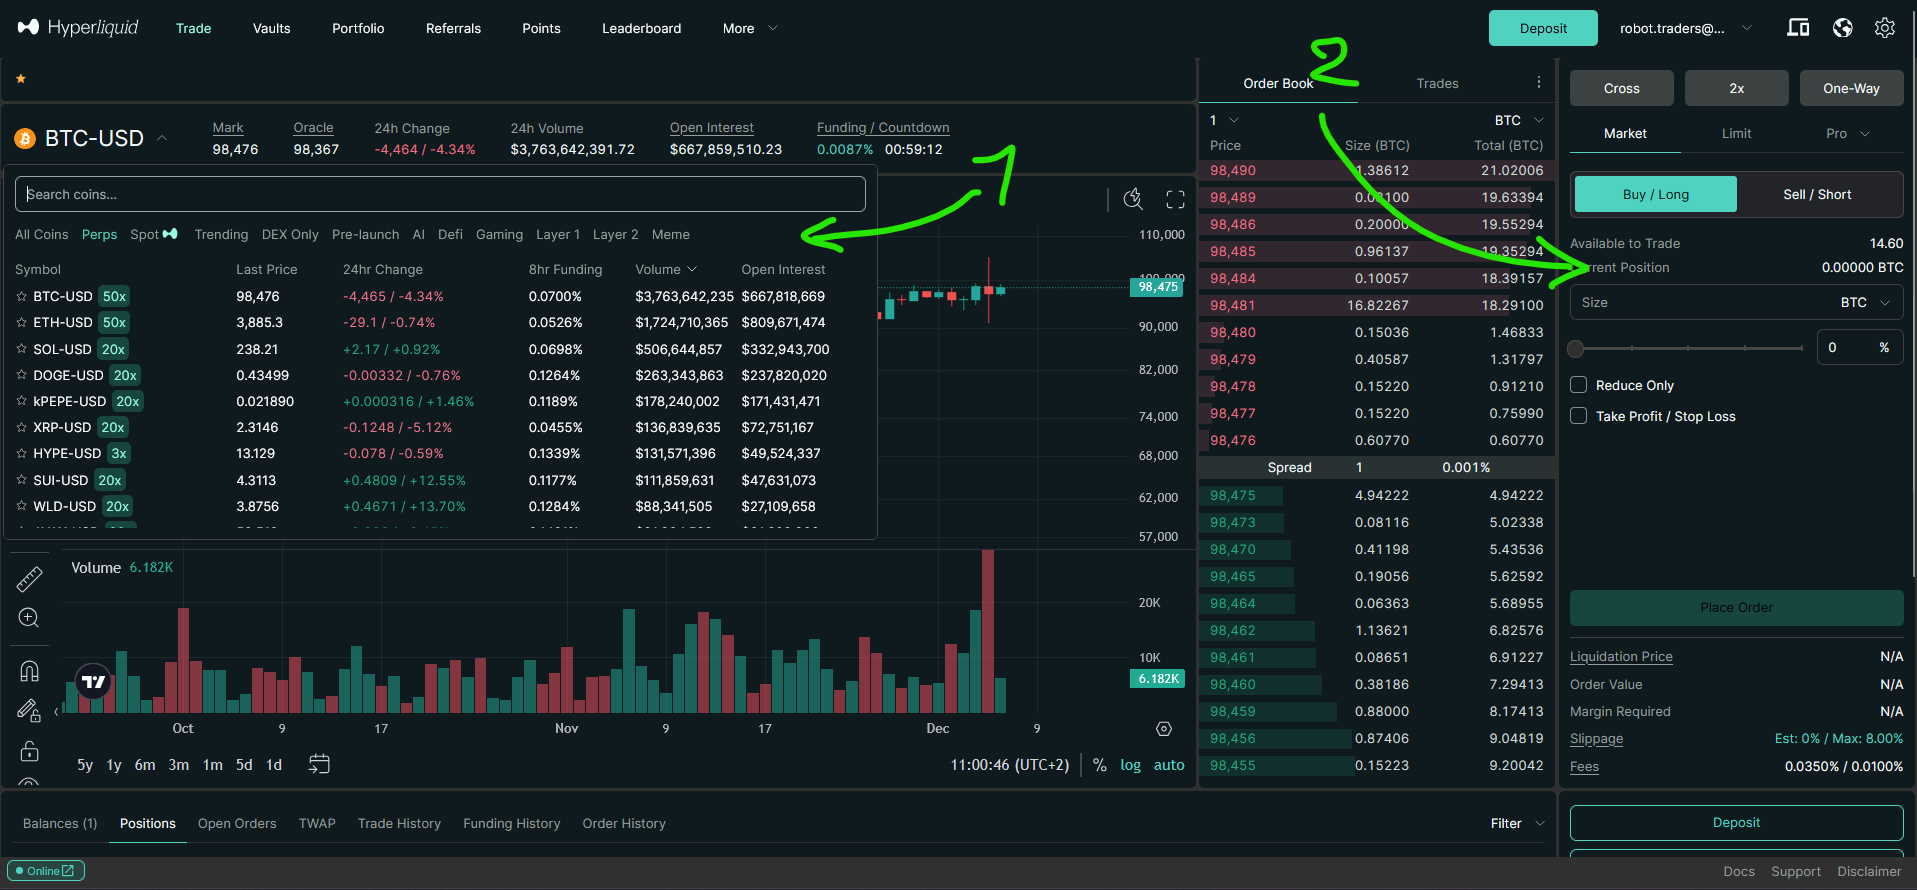
Navigating the Trading Interface
The Hyperliquid interface mirrors what you'd find on a centralized exchange. A wide selection of perpetual futures markets is available on the left (1), and the order panel on the right (2) supports all standard order types. You can configure margin mode, leverage, reduce-only settings, and attach stop loss or take profit conditions directly from this panel.
The world's #1 decentralized exchange 4% discount on trading fees
Creating API Keys for Algorithmic Trading on Hyperliquid
Automating trades requires API keys. On Hyperliquid, these are called "API Wallets" (or "agent wallets"), and they come with a built-in security advantage: API wallets can place orders on your behalf, but they cannot perform withdrawals. Your main wallet's private key is never exposed to your trading code.
To create an API wallet, navigate to the "More" menu (1) in the top navigation bar. Name your wallet (2), click "Generate" to create its address (3), then click "Authorize API Wallet" (4) to activate it.
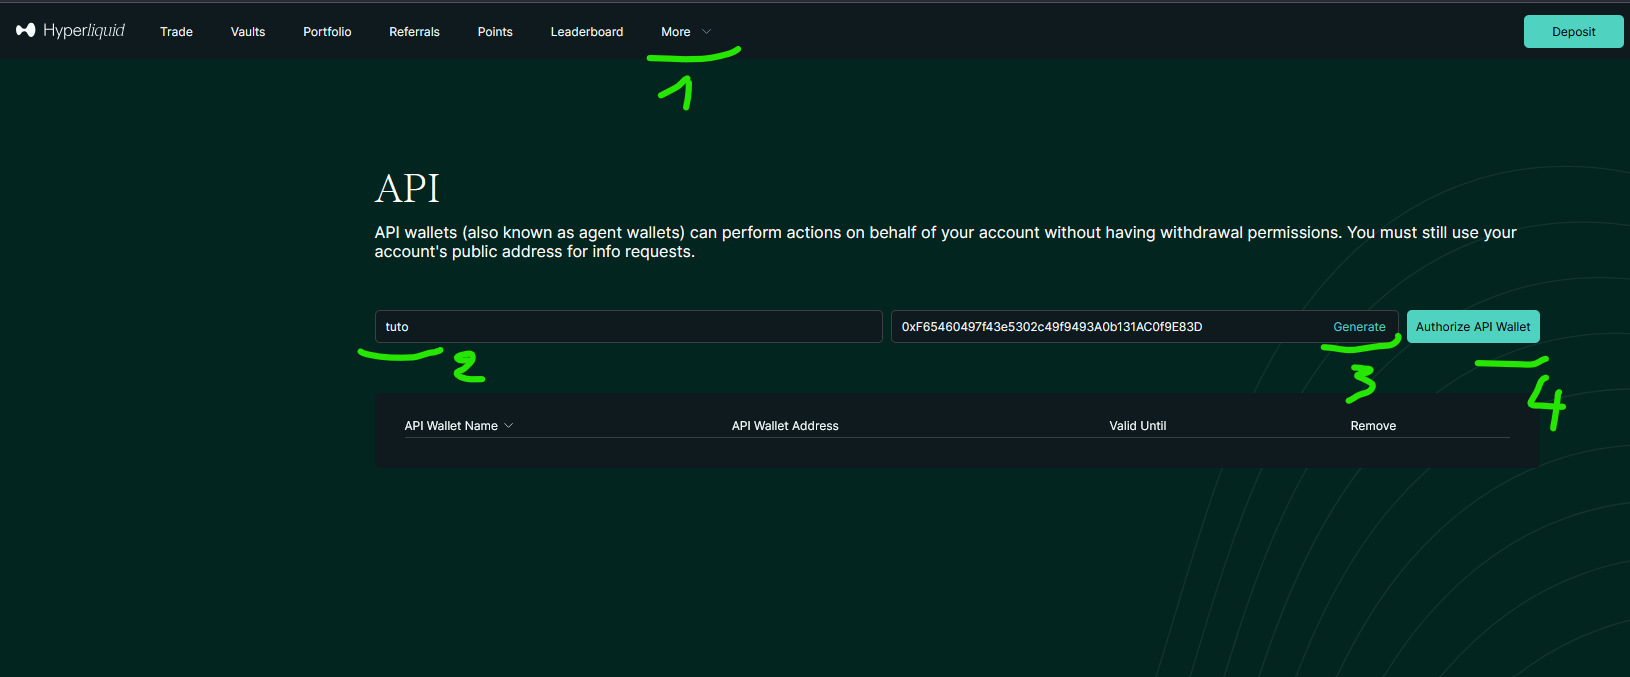
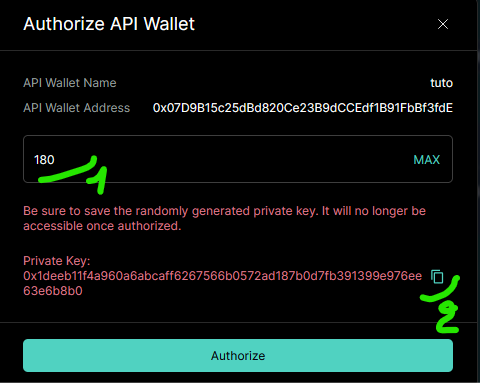
A confirmation window appears after clicking "Authorize". Set the expiration period (1), with a maximum of 180 days, and copy the private key (2). This key is displayed only once and cannot be retrieved later, so store it in a secure location immediately.
Connecting to Hyperliquid in Python with CCXT
CCXT is an open-source library that provides a unified trading interface for hundreds of crypto exchanges. It handles authentication signatures, request formatting, and exchange-specific quirks, so your code stays the same regardless of the exchange. Hyperliquid is fully supported.
Authentication requires two pieces of information: your account's public address and the API wallet's private key.
import ccxt
dex = ccxt.hyperliquid({
"walletAddress": "...", # Public address of your account
"privateKey": "...", # Private key from the API wallet
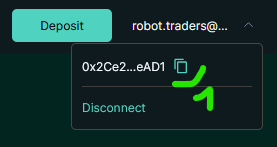
})A common mistake: the walletAddress field expects the public address of your main account, not the API wallet address you just created. Find it by clicking on your account name in the top-right corner, then use the copy button (1) next to the address.
The privateKey field takes the private key from the API wallet generated in the previous step. These credentials are confidential; never commit them to a public repository or share them.
To verify that authentication works, call fetch_balance:
balance = dex.fetch_balance()
print(balance["USDC"])
# {'total': 19.913163, 'free': 19.913163, 'used': 0.0}
If this returns your USDC balance without errors, the connection is properly configured.
Placing and Managing Orders on Hyperliquid with Python
Market Orders
Placing a market order uses ccxt's standard create_order method:
symbol = "ETH/USDC:USDC"
order_type = "market"
side = "buy"
amount = 0.01
price = dex.load_markets()["ETH/USDC:USDC"]["info"]["midPx"]

order = dex.create_order(symbol, order_type, side, amount, price=price)
One Hyperliquid-specific requirement: market orders require a price parameter. This serves as a slippage protection mechanism. The exchange uses this price to calculate the maximum acceptable execution price (default slippage tolerance is 5%). Without it, ccxt raises an ArgumentsRequired error. Using the mid-price (midpoint between best bid and best ask) from load_markets() is the standard approach.
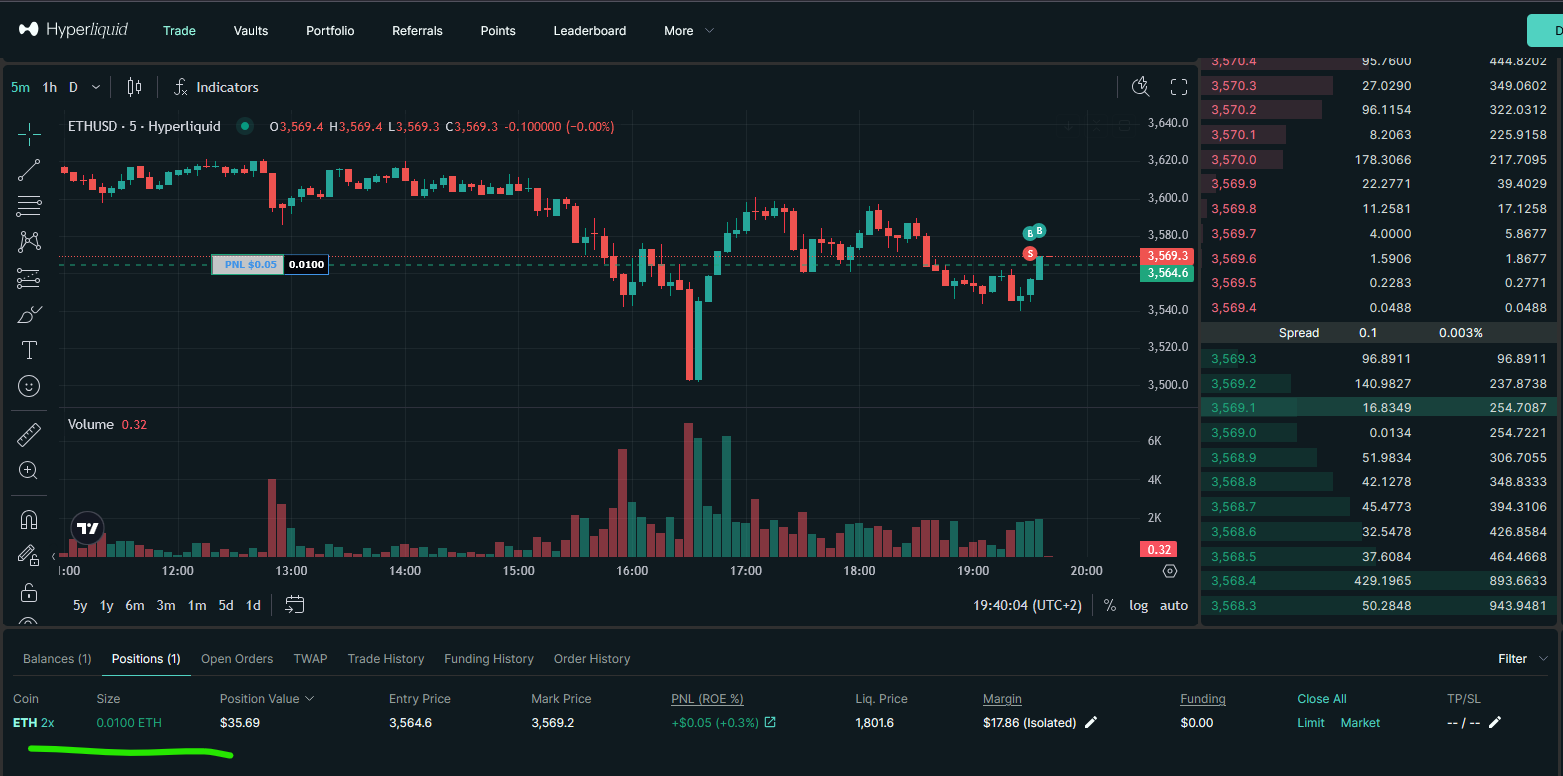
The symbol format ETH/USDC:USDC designates the ETH/USDC perpetual futures market. The :USDC suffix indicates that the contract is settled in USDC. After execution, the position appears in the interface below the chart.
Retrieving Open Positions
Once a position is open, fetch_positions returns its full details: size, direction, entry price, liquidation price, unrealized PnL, leverage, and margin usage.
positions = dex.fetch_positions(["ETH/USDC:USDC"])
position = positions[0]

print(f"Side: {position['side']}")            # 'long'
print(f"Size: {position['contracts']}")        # 0.01
print(f"Entry: {position['entryPrice']}")      # 3932.4
print(f"PnL: {position['unrealizedPnl']}")     # -0.114
print(f"Leverage: {position['leverage']}")     # 2.0
print(f"Liq. price: {position['liquidationPrice']}")  # 1987.45
This data feeds directly into risk management logic: monitoring drawdowns, checking margin levels, or deciding when to scale in or out of a position. For example, comparing unrealizedPnl against a threshold can trigger an automated exit, while liquidationPrice lets you verify that your position has enough margin headroom before adding to it.
Closing a Position
To close a long position, place a sell order for the full position size with reduceOnly set to True:
symbol = "ETH/USDC:USDC"
amount = dex.fetch_positions([symbol])[0]["contracts"]
price = dex.load_markets()[symbol]["info"]["midPx"]

dex.create_order(symbol, "market", "sell", amount, price=price,
                 params={"reduceOnly": True})
The reduceOnly parameter prevents the exchange from interpreting the sell as a new short position. Without it, instead of closing your long, you'd end up with an open short. This is a common source of bugs in trading bots, especially when the same create_order function handles both entries and exits.
Limit Orders
Limit orders execute only when the market reaches the specified price:
symbol = "ETH/USDC:USDC"
amount = 0.01
price = 3300

order = dex.create_order(symbol, "limit", "buy", amount, price=price)
If ETH doesn't reach $3,300, the order stays open. You can monitor it in the "Open Orders" tab on the Hyperliquid interface.

Storing the order variable is useful for managing the order later, since it contains the order ID needed for cancellation or modification.
Canceling Orders
To cancel a pending order, pass its ID (returned by create_order) to cancel_order:
dex.cancel_order(order["id"], "ETH/USDC:USDC")Advanced Trading: Leverage, Stop Loss, and Take Profit on Hyperliquid
Configuring Leverage and Margin Mode
Before opening a position, configure leverage and margin mode to match your risk management approach. Hyperliquid offers two margin modes:
- Isolated — margin is confined to the current position. If the position is liquidated, only the allocated margin is lost.
- Cross — all available funds in your account back open positions, providing more margin but exposing your full balance to liquidation risk.
symbol = "ETH/USDC:USDC"
dex.set_margin_mode("isolated", symbol, params={"leverage": 2})
This setting applies to all future positions opened on that symbol. Hyperliquid supports up to 50x leverage depending on the market.
Take Profit Orders
A take profit order closes your position automatically when the price reaches a target level. For a long position, this is a sell order with takeProfitPrice and reduceOnly:
symbol = "ETH/USDC:USDC"
price = dex.load_markets()[symbol]["info"]["midPx"]
amount = 0.05  # Partial TP; use fetch_positions for full close
tp_price = 4500

dex.create_order(symbol, "market", "sell", amount, price=price,
                 params={"takeProfitPrice": tp_price, "reduceOnly": True})
Set amount to a fraction of your position for a partial take profit, or fetch the full size from fetch_positions to close everything at the target.
Stop Loss Orders
Stop losses protect against adverse price moves using stopLossPrice:
symbol = "ETH/USDC:USDC"
price = dex.load_markets()[symbol]["info"]["midPx"]
amount = dex.fetch_positions([symbol])[0]["contracts"]
sl_price = 3500

dex.create_order(symbol, "market", "sell", amount, price=price,
                 params={"stopLossPrice": sl_price, "reduceOnly": True})
Combining both TP and SL on the same position creates a bracket order: the position closes automatically whether the market moves in your favour or against it.
Stop Market Orders for Breakout Entries
Stop orders are not limited to risk management. They also serve as conditional entry orders that trigger when the market reaches a breakout level:
symbol = "ETH/USDC:USDC"
price = dex.load_markets()[symbol]["info"]["midPx"]
amount = 0.05
stop_price = 4200

dex.create_order(symbol, "market", "buy", amount, price=price,
                 params={"stopPrice": stop_price})
This order buys ETH when the price crosses above $4,200, useful for momentum strategies that enter on confirmed breakouts rather than trying to predict reversals.
The world's #1 decentralized exchange 4% discount on trading fees
From Setup to Live Bot
Hyperliquid covers the full spectrum of order management that algorithmic trading demands: market and limit orders, position tracking, leverage configuration, and automated exits through stop losses and take profits. Because ccxt abstracts the exchange-specific details, the code patterns shown here are nearly identical to what you'd write for any other supported exchange. Migrating an existing bot to Hyperliquid, or running the same strategy across multiple venues, becomes straightforward.
The main consideration when moving from a centralized exchange is the wallet-based authentication model. Instead of traditional API key/secret pairs, you work with wallet addresses and API wallet private keys. Once that difference is accounted for in your configuration, the rest of the trading logic (order placement, position management, risk controls) transfers directly.
Two next steps could be interesting from here. Backtest Your Crypto Trading Bot on Hyperliquid DEX shows how to validate a strategy on historical data before risking real capital (notebook). Once a strategy holds up in backtesting, Build Your Hyperliquid DEX Crypto Trading Bot in Python covers assembling these API calls into a complete autonomous bot (script).
Sources
- Hyperliquid, Official Trading Platform
- CCXT, Hyperliquid Exchange Documentation
This article contains affiliate links. If you sign up through these links, we may earn a commission at no additional cost to you.